

This presentation explains and demonstrates the use of Office Mix, Skype for Business and Microsoft Whiteboard. This is a supplement to the faculty training session on 1/2/18. Attendees will come away with a repertoire of skills useful in keeping students engaged in and out of the classroom. Enjoy!
Spring 2017 OneNote Planners
The spring 2017 OneNote planners are now available for download right here.
First, download the file through the above link. Then:
In order to open the planners you have to:
Double click on the planner that you wish to open
Download the file
Select Open
Select CreateIn case of any confusion, I have provided a screenshot of the final step listed. If you have any questions, please feel free to ask.
Have a great day,
Rachael Blanchard
Technology Support Technician
(413) 529-3335
rblanchard@williston.com
Copying Text from a Picture
Copying text from a picture is a useful technique that can be performed on images and screen clippings in OneNote. It does require a bit of formatting at times and can be fussy depending on the type of document from which the text is derived. (scanned images tend not to work as well).
Step 1: Right click on the image, then click on “copy text from picture”
Step 2: Click “Paste”. Text copied from a picture can be pasted into any other program such as, Word, PowerPoint, Outlook etc.
Copying text from a picture can be useful for modifying test questions from a scanned page of a textbook, or from a pdf version of a test. Helpful for test security.
Note: If you use Office Lens to take a picture, you can save the picture as a .pdf with searchable text. This is another method for getting text from an image.
Screen Capturing
Have you ever wanted to capture your OneNote lectures but weren’t sure how? Maybe a student was absent, and you’d like to send along the class discussion. Maybe you’re hoping to archive the lesson for next year. Or perhaps you’re looking to share your work with colleagues for professional development. Microsoft Mix is a quick and easy option to satisfy all these needs!
Before you start, “Screen Recording” will create a digital video file (in .mpeg format) of all the actions you take on your screen, as well as any sound picked up by your Surface’s microphone. You can then save this file to your Surface or upload it to YouTube, whatever your needs.
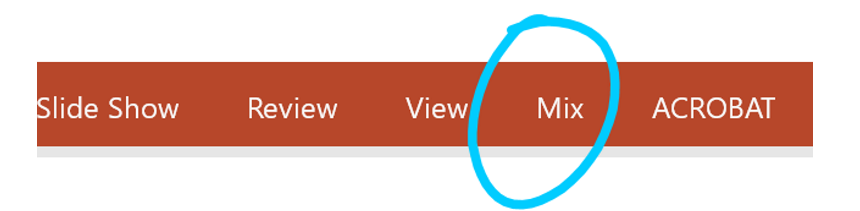
Step 1: Open PowerPoint and click on “Mix”
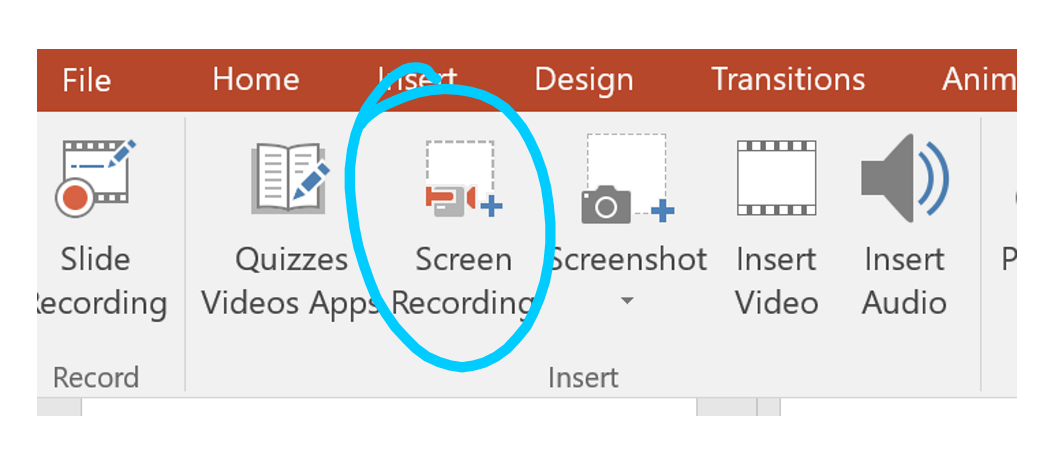
Step 2: Choose “Screen Recording”
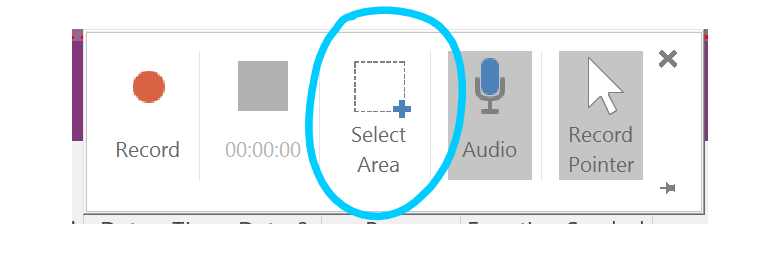
Step 3: Click on “Select Area”
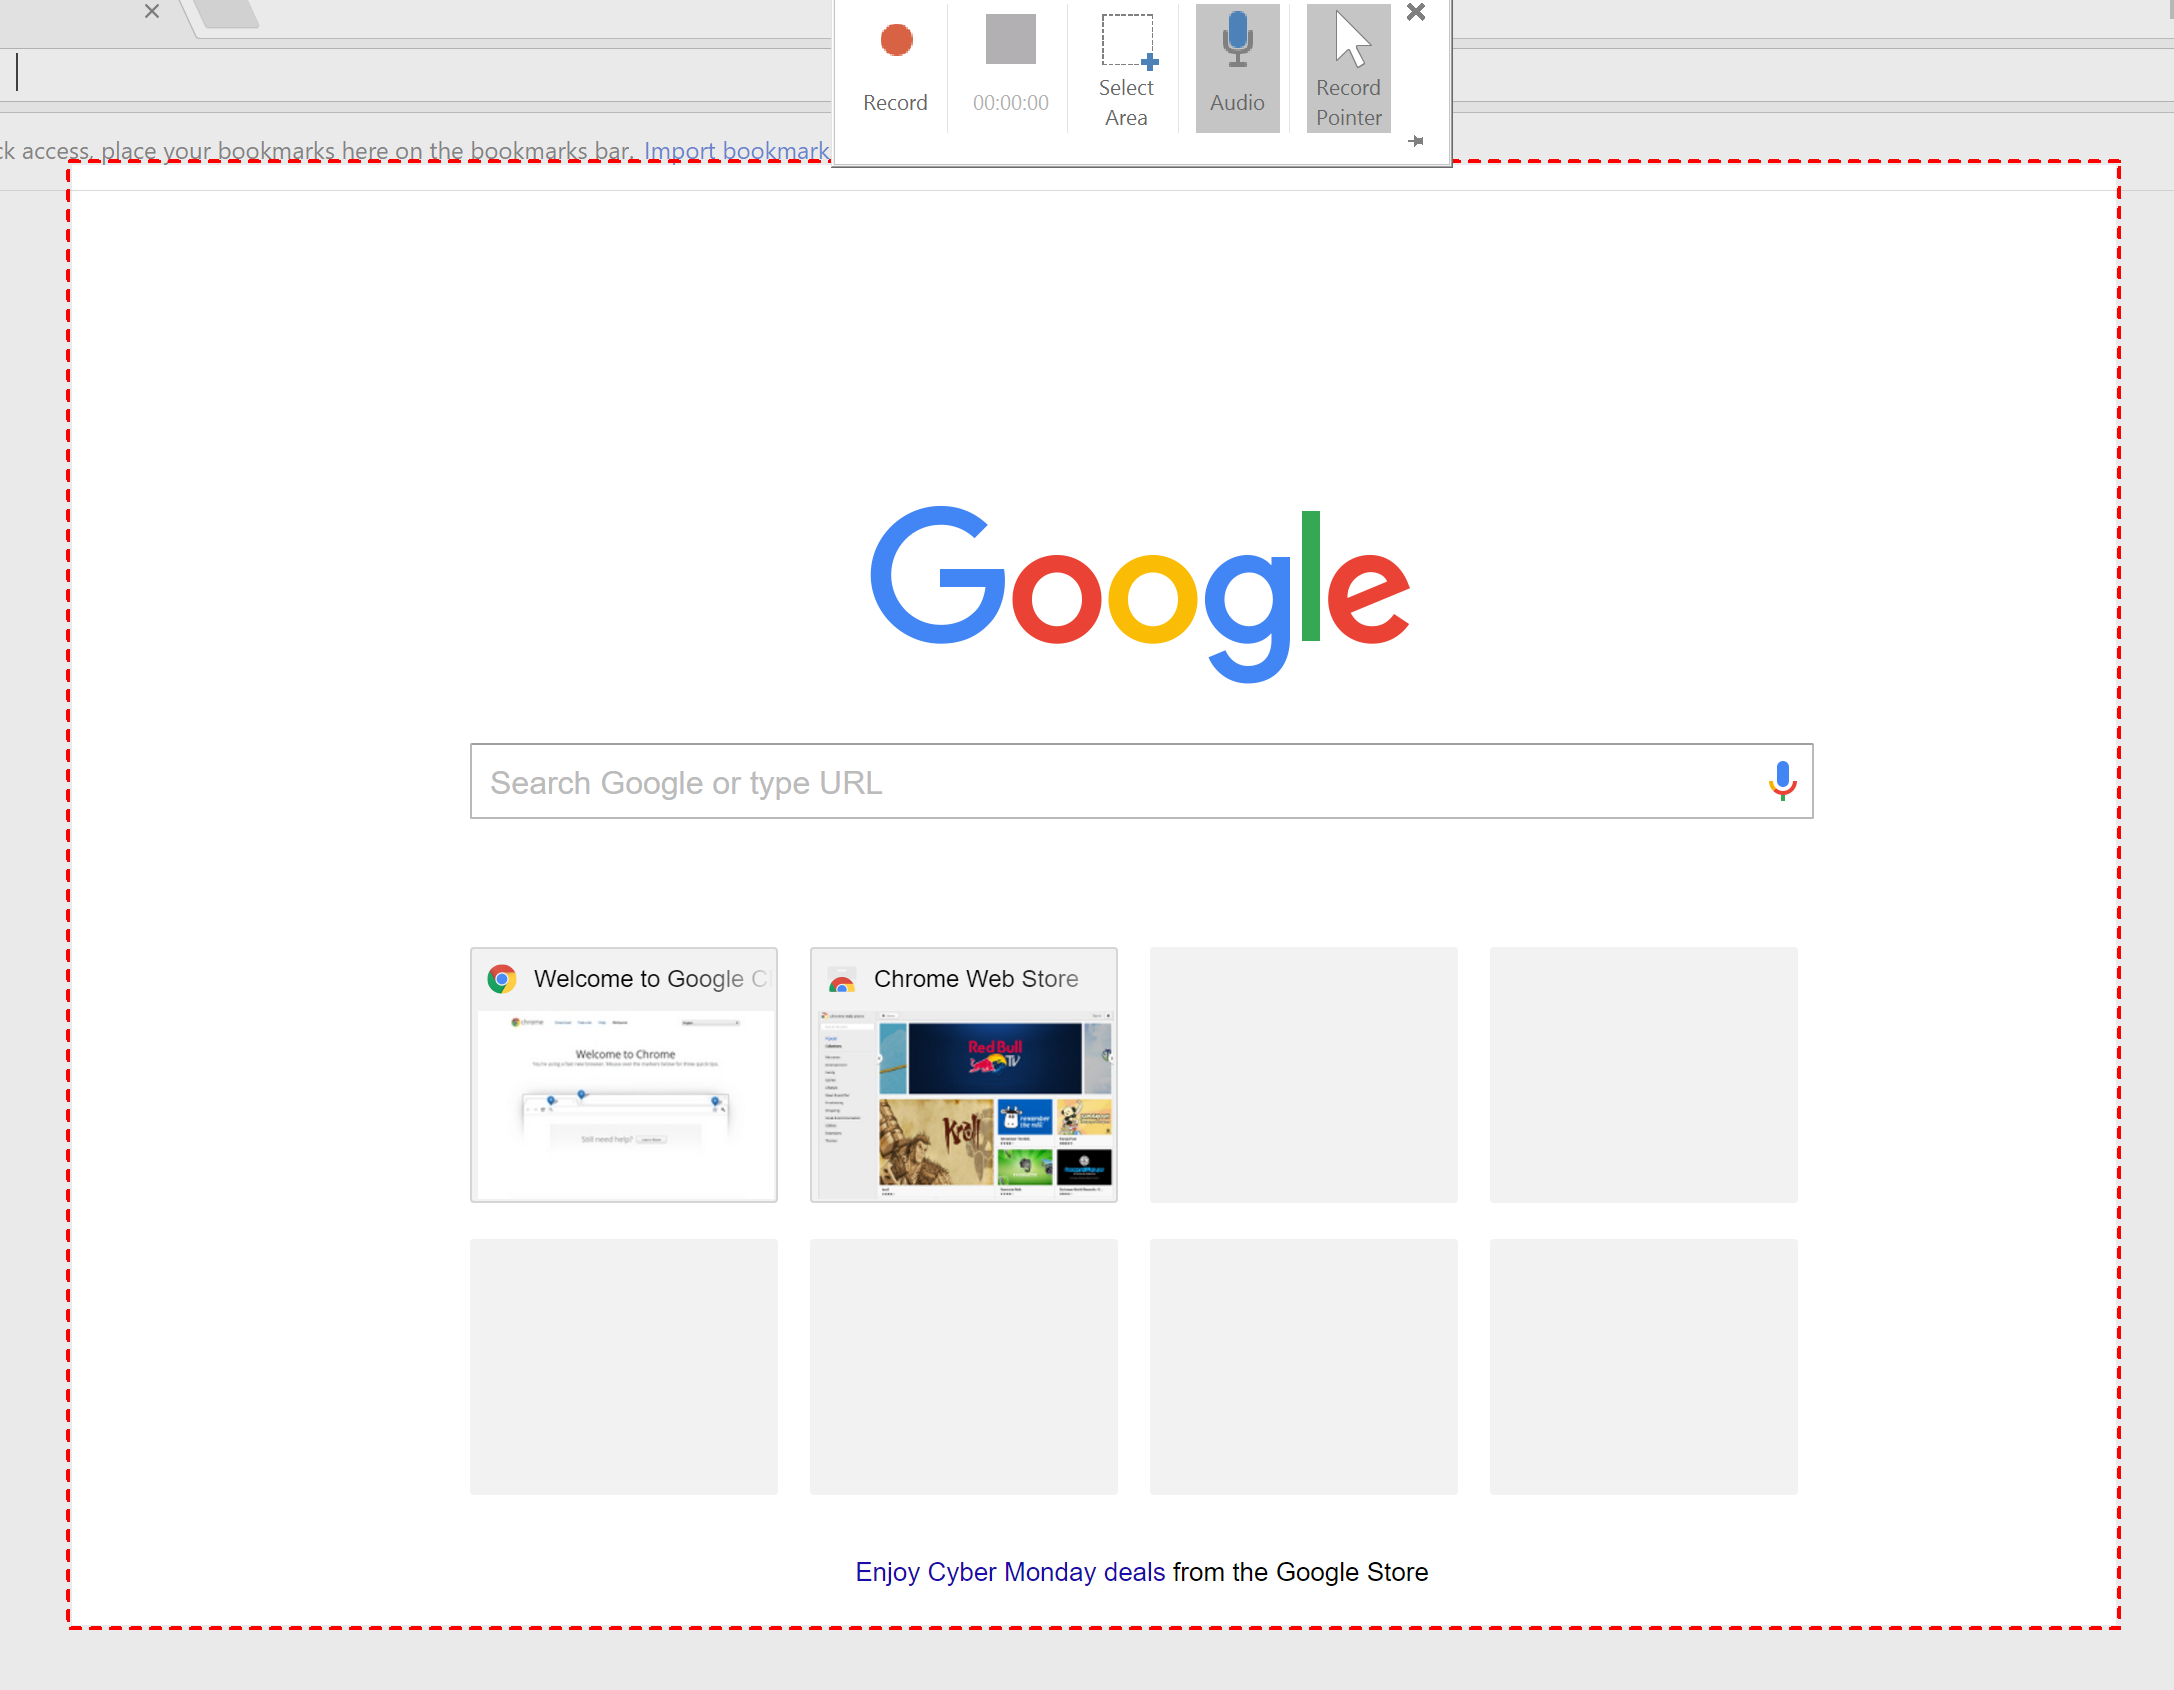
Step 4: Drag across the area you would like to capture
Step 5: Click on “Record”

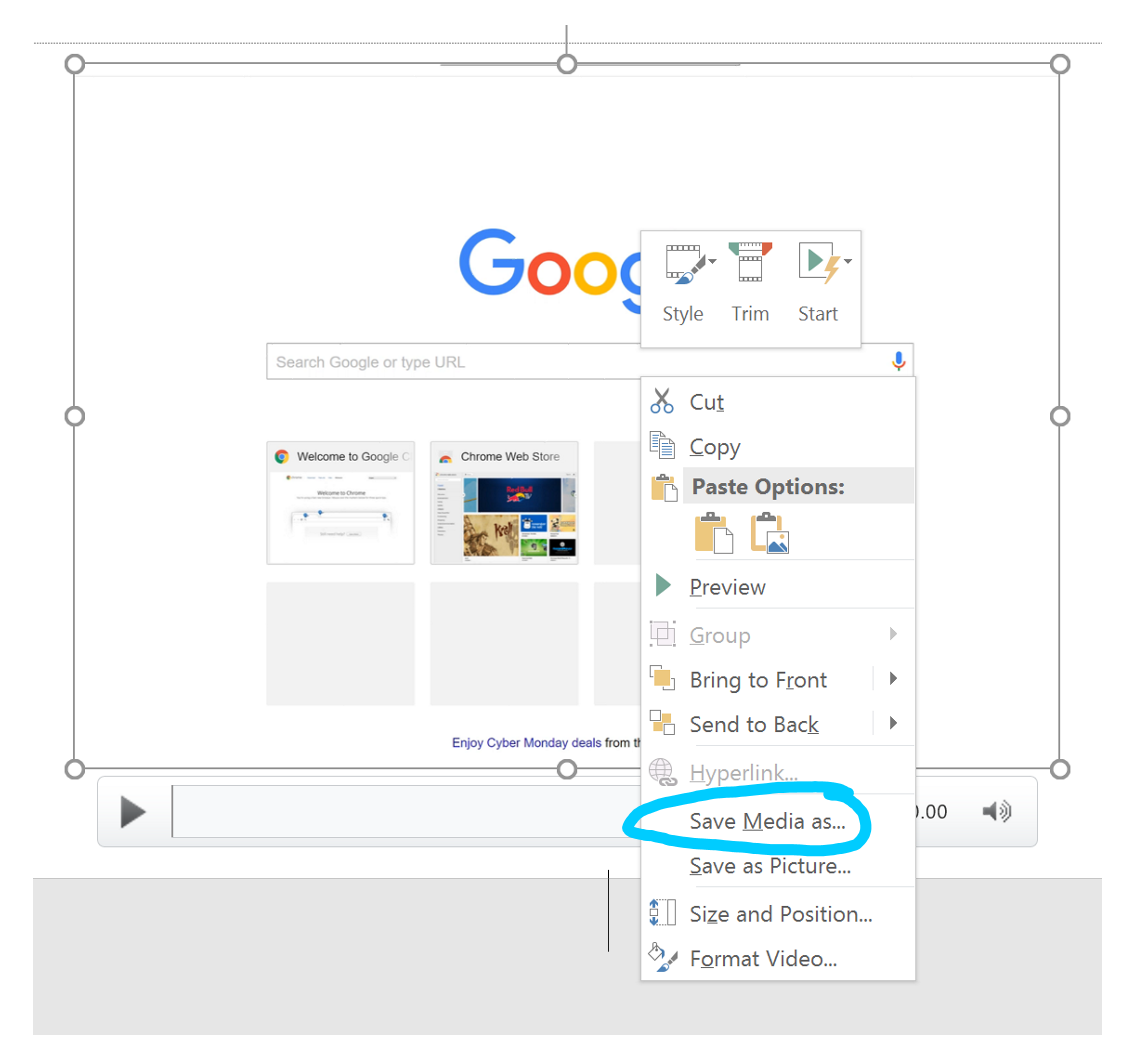
Step 6: When finished, click on “Stop”. The video will then be embedded into a slide in PowerPoint. You can right click on the video and select “save media as…” you can then choose a desired name and location for the video.
This just in from Tech:
Middle School T2 Planner 2016-2017
Upper School T2 Planner 2016-2017
In order to open the planners you have to:
Double click on the planner that you wish to open
Download the file
Select Open
Select CreateIn case of any confusion, I have provided a screenshot of the final step listed. If you have any questions, please feel free to ask.
Have a great day,
Rachael Blanchard
Technology Support Technician
(413) 529-3335
rblanchard@williston.com
Reminders from AT
Here are a couple of reminders we thought would be pertinent as we begin a new term:
1. To add/remove students from an existing class or to create a new ClassNotebook, the link is www.onenote.com/classnotebook. Instructions can be found on the EdTech blog, http://willistonblogs.com/edtech/, by clicking here.
2. Students are encouraged to archive materials in a personal notebook if they would like to access their work from a ClassNotebook in the future. It would be good to remind them of this from time to time. Instructions for creating a personal notebook and moving/copying materials can be found, again, on the EdTech blog by clicking here.
3. When setting up gradebooks in Veracross, you have a choice between “Total Points” or “Weighted Categories”. It’s always a great idea to consult with your department chair to make sure your grading practices are aligned with those of the department and the school.
4. There has been more and more interest in screen-recording using Office Mix and Snagit. The Snagit key is: [Ask us via email], this must be entered the first time you use the program.
5. When using ClassPolicy, please remember to “End Class” when your class meeting has ended – students are restricted from programs until the teacher releases them.
As a final plug … feel free to reach out to your AT consultant if you would like to work on integrating technology into your lessons. We are always excited to strategize and help implement new tools.
Have a great week, everyone!
- Academic Technology
Creating Personal OneNote Notebooks
As we near the end of the trimester, it may be useful for students to archive work they have created in their section of a ClassNotebook. The following tutorial guides students through the process of creating a personal notebook in OneDrive for Business into which they may copy pages and resources.
Adding or Removing Students in OneNote ClassNotebook
A document outlining how to add or remove students from a OneNote class notebook is now online on the Support Docs page:
Adding or Removing Students in OneNote ClassNotebook
If you are using the OneNote ClassNotebook system for your classes, you may need to make some changes to the roster as students adjust their schedules. Attached are instructions for making these changes. Please note, this must be done online through the “ClassNotebook Wizard” found at www.OneNote.com/ClassNotebook.
Trimester 1 OneNote Planners
Two new documents have been added to the support docs page:
- OneNote Upper School T1 Planner (OneNote notebook file)
- OneNote Middle School T1 Planner (OneNote notebook file)
To open the Notebook and ensure that it saves properly, please double click on the attachment.
When prompted, select “Save” and do so in any location that will be easy for you to access (example, Desktop or Documents).
Next go to the location that you saved this Notebook, and open that notebook by double clicking. It should open up in OneNote now. If you get a message asking you to unpack the notebook, click “create.”
If you have any questions or problems with the Planner, please let Tech know!
Two new faculty support docs
Three new items have been added to the support docs archive:
- OneNote Class Notebook Creation: How to get your notebooks setup for each of your classes.
- Veracross and Gradebooks: What to do to get your gradebooks setup in Veracross.
- Migrating Classes in Veracross: How to import materials from last year.